Street Fighter IV was on the horizon and on some gaming sites that I frequent lots of users were picking up new arcade sticks to play the game with. After all, it’s Street Fighter and if you are trying to pull off a hadoken, a shoryuken or even just move forward on the stock Xbox 360 d-pad then you’re going to be in a world of hurt. I’m not a big fighting game fan, but it did pique my interest to see some folks assembling their own custom sticks to get the exact look or performance that they wanted. Plus you get the added bonus of being able to update your stick to support future game consoles. It had been a little while since I’ve done any type of DIY so I figured that it would be a fun little project to give the whole custom stick building a whirl.
Stage 1: Picking the parts (or “You’re not actually going to try doing Cammy’s Ex Spiral Arrow, Cannon Spike, Focus Attack Back Dash Cancel into Gyro Drive Smasher with an American stick, are you?”)The first step for me was to pick out the parts that I wanted. Since I’m a total stick rookie I had to do quite a bit of research to solidify the parts that I was looking for.
Slagcoin and the
Tech Talk forum at Shoryuken were my main stops for trying to figure out what gear I wanted. The first step in the process was to determine if I wanted Japanese or American arcade parts in my stick. In general terms, American sticks have a bat top, a longer throw, stiffer springs and an octagonal gate while Japanese sticks have ball tops, shorter throws, looser springs and square gates. The
gate of a joystick is the plastic device that restricts the normal motion of the joystick. An octagonal gate allows for smother 90, 180 and 360 degree motions but you lose the precision of a square gate when attempting to cleanly hit diagonal directions.
The general consensus online is that Japanese sticks perform better if you aren’t too used to American sticks already, so I decided to go with one of those for my project. Between Japanese brands there are two major choices, Sanwa and Seimitsu. Sanwas seems to be slightly preferred for fighting games (they come as stock in Street Fighter IV arcade cabinets) and Seimitsus slightly favored for shooters but it seems to mainly be a
matter of personal taste. I liked the idea of the short throws and slightly more rounded gate on the Seimitsu LS-32 so I picked that as my stick. I also grabbed 8 transparent 30mm Seimitsu buttons (4 blue and 4 white for the face buttons) and 3 opaque 24mm Seimitsu buttons (for Back, Guide and Start buttons on the front of the stick). There are only a few online US shops that that stock up on this stuff but I had really good luck ordering from
Lizard Lick, very fast shipping.
Stage 2: Building a box (or “I love the smell of burning lexan in the morning!”)The next step for me was to get the basics of the box and control panel completed. As a starting point I used the
idiot box sample controller from Slagcoin. To make it fit my needs better (8 button layout, lots of room to solder on the inside) I bumped up the sizing to 15”x9”x2” which was a pretty big increase over the normal size. When it came time to do the wiring I was very glad that I choose to add this extra room on the inside.
The idiot box suited me well as it was a simple build that didn’t require precision cut or routing as all that I had access to was a jigsaw and a hand drill. All in all the box came together pretty well, but with only hand tools I made all my cuts really generous so I had to do a ton of filing and sanding to get them to fit together reasonably close. I actually did so much of this that by the end I just got sick of it and you can see some pretty nasty joint lines in the finished project.
Cutting the top control panels was also pretty interesting. Drilling in the ¼ inch MDF layer was easy but it took me almost 3 hours to get all the holes drilled in the lexan. I used a spade bit with really low torque to get though with minimal cracking (you can see a small chip under the Y button on the finished project) but it was a highly long and painful process.
Stage 3: Padhacking (“or how to void a warranty like a pro”)Padhacking is the art of taking apart and video game controller and soldering in all your own wires to route to your buttons and joysticks. For my project I used the GameStop branded Matcatz control pad. The advantage of this guy is that it’s only 25 bucks, has a long cord and uses a common ground. The common ground is nice so that you only have to solder one ground wire from the pad as opposed to having the solder a ground for each individual button. As you can see below things start to get pretty crowded even with common ground when you are wiring all eleven buttons.
 |
A tricky part was that I wanted to wire up the trigger buttons as action buttons (many custom builders omit the triggers). The triggers are tricky since you need to use resisters and an NPN transmitter to convert the analog triggers into simple on-off button presses. Luckily smarter folks (mainly Toodles on Shoryuken) then I had already mapped out the circuit and I just needed to implement it and find room for the breadboard.
As you can see below, thing can get pretty crowded when you put it all in. I used terminal strips to organize the grounds and signals, that way if I need to replace a button I don’t need to do any desoldering on the actual pad. It’s also nice that if the Xbox 720 comes out, and doesn’t support my controller anymore I should be able to drop in a new pad to replace the current one.
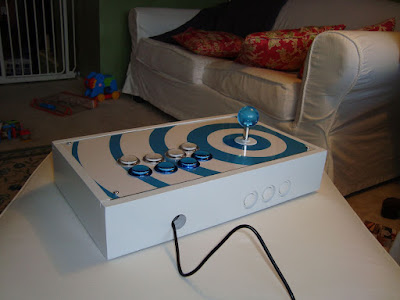
Stage 4: Finishing up (“or finally I get to have my free time back!”)The end stages started out with priming and spray painting the box white. Painting was a pretty easy process, although as noted before I didn’t sand enough to get a really smooth finish on the sides. After that I mocked up a few designed for the top and after selecting one took it to FedEx Office to get printed out on white card stock. Finally I had to rig up all the guts inside the box (I was so worried about breaking connections during this it’s not even funny) and add the layer of lexan on the bottom.
 Stage 5: Putting it to use (“Ikaruga here I come!”)
So in the end I plugged it in to find that all my connections were solid and that every button works as expected. And, in spite of a laundry list of minor cosmetic flaws the stick is solid, looks good and performs great. I’ve given it a spin with Street Fighter III (I’ve got IV on order from Amazon) and with Ikaruga and it was great fun with each game. At a few points along the way I felt a little silly for taking all this time and effort considering that I don’t even play fighters or shoot-em-ups that much. But now that I actually have the finished project in my hand I can see how those genres are just way more fun with an arcade stick as opposed to a pad. Just like you can technically play Guitar Hero with a normal controller it’s just way more fun to play it with the controller that was intended for it. Just having the stick is going to make me go out to look for more arcade type games (need to grab some more Microsoft Points) to play with it. The long and short of it is that while it took longer than I expected it was a pretty fun process and I’m actually surprised with the quality, durability and looks of my finished project.
More photos of the process
here.


%20037.JPG)